Which Way the Witch King?
A MAGIC REALM Seminary
by Paul R. Bolduc
The Witch King is undoubtedly the most interesting and
challenging of all the characters that travel the MAGIC REALM. His powers are
mighty yet ephemeral. He must survive on magic alone for he has neither MOVE
or FIGHT counters. The Heavies (Dwarf, Berserker, and White King) can afford
to put all their victory points into Fame and Notoriety , then go out looking
for trouble and expect to survive, prosper, and even win within a week. Not
so the Witch King, who may not even be able to leave the Inn if his choice of
starting spells is poor. How then, is one to go about playing this character
whose command of the awesome Type IV, V and VI spells ought to demand the respect
of every opposing player? It is the purpose of this article to acquaint the
reader with some of the less arcane approaches to this question.
GAME MECHANICS
For those of you unfamiliar with the game who might have missed Richard Hamblen's
fine article "The Magical Mystery Tour" (The GENERAL, Vol.
16, No.4), here's a capsule summary of how the game is played. Be warned; I'll
be talking in generalities. Just about every major rule has an exception somewhere
involving spells, treasures, or special advantages. I'll also be using the rules
as amended and clarified in that issue.
To begin play, the 20 tiles that comprise the board are dealt out to all the
players who then assemble the board tile by tile. Warning, Sound, and Treasure
Location counters are secretly and randomly distributed. At this point the players
choose their characters.
For each character he controls, the player will choose victory conditions, dividing
four victory points (VPs) between five categories: Great Treasures (1/VP), Usable
Spells (2/VP), Fame (10/VP), Notoriety (20/VP), and Gold (30/VP). Thus a magic
user could take one point in each of the first four categories and would win
when he has, as a minimum, possession of one Great Treasure, learned 2 spells,
and attained 10 Fame and 20 Notoriety points.
Those characters who begin the game with re corded spells choose them now. MAGIC
counters may freely be converted into color counters. The campaign /
Mission / Visitor counters are placed. Finally, the Warning counters in the
valley tiles are revealed, the Dwellings and Ghosts set up, the character counters
placed at the Inn, and the game properly begins.
MAGIC REALM is played in turns called "days". Each day is divided
into a "Movement Portion" and a "Combat Portion". The Movement
Portion is subdivided into "phases"; characters get four phases a
day, plus bonus phases for individual special advantages or treasures, plus
or minus a phase for weather effects. Characters in, or moving into, cave clearings
only get two phases per day plus bonuses regardless of weather. A character
can perform only one activity per phase. Activities include such fantastical
pursuits as Hide, Move, Spell, Search, Alert, Rest, Trade, Hire, and Fly. A
special activity, Follow, allows a character to follow another character or
hired leader, doing whatever the followee does. Each character's moves are recorded
secretly prior to the Monster Roll.
Blocking is also a special activity, and an important one. In the first two
encounters, it leads to many a draw. Unlike any of the others, Blocking doesn't
need to be written. A character may voluntarily block another character, monster
or native group (the target) merely by being in the same clearing as the target
provided that it isn't hidden (unless the character has found "Hidden Enemies"
that day), and either of them has expended at least one phase already that day.
Now the bad news, when blocking (or being blocked) the character forfeits the
rest of his written move. Monsters block characters whenever possible.
A character's weight and twelve combat counters define his vulnerabilities and
abilities. A character is killed when struck by damage equaling or exceeding
his weight. Each of the combat counters is inscribed with an action, a weight
(except MAGIC counters), a time, and zero, one or two fatigue asterisks. The
action is either MOVE. FIGHT, (do) MAGIC, DUCK, or (go) BERSERK. The weight
describes how much force is involved with the blow (FIGHT) or how much one can
carry (MOVE). The time number describes how fast the action is, lower numbers
being quicker. The fatigue asterisks are a measure of the effort involved in
performing that action at that speed and weight.
Once all the characters have committed them selves in writing, the die is cast
to determine which monsters and natives are active that day. The character to
move first is randomly determined and his written move is read and executed.
The Warning and Sound/Treasure counters in the tile he ends in are revealed,
and any active monsters or natives cited on the Setup Card are placed or moved.
The next character to move is determined, and so forth until all characters
have either fully executed their moves, blocked, or been blocked by a character,
monster, or native group.
Activities can be grouped into two classes: those that require dice rolls (Hide,
Hire, Trade, Search) and those that don't. In most cases, two dice are rolled
and the higher of the two is taken as the resultant roll. This generates the
set of probabilities shown in Table 1.
Normally, movement is along roadways, passing from clearing to clearing. There
are three kinds of clearings (woods, mountain, and cave) and four kinds of roadways
(open, tunnel, hidden paths, and secret passages); except for the Wizard, characters
must search for and find the latter two before they can be used. Best odds are
25% for paths and 16.6% for passages. When flying, one travels from tile to
adjoining tile with the landing clearing determined by a die roll.
To deal with natives, a character must be in the same clearing with them. After
stating his intention (to hire or trade), the player rolls on the "Meeting
Table". While it is possible to get an item for free, one will usually
spend two to four times its base price (the price listed on the individual treasure
card or on the Price List). Treasures can be bought from or sold to native leaders,
visitors, or other characters: they can also be looted from one of the eight
treasure locations after the character has 'found' , the location counter by
rolling on the search tables.
Hiding, if successful, allows a character to sneak by marauding monsters unmolested
and to avoid other characters unless they have 'Found Hidden Enemies', that
day and elect to block him.
After all movement for the day is completed, the "Combat Portion"
of the day occurs. This is divided into rounds consisting of three steps: Encounter
, Melee, and Fatigue. In the Encounter step, monsters and unfriendly natives
are apportioned to any characters in that particular clearing. Characters may
then try to prevent other characters from running away or try to run away themselves.
Spells are cast at this time. In the Melee step, attacks are made and resolved.
In the Fatigue step, combat counters are wounded or fatigued as necessary .Combat
continues in a clearing until only one character remains, or no one/thing was
killed, or combat counter wounded or fatigued for two rounds.
Spells come in eight "ritual types", and are "fed" by five
colors. Most spells will only activate in the presence of one particular
color. Permanent spells are lasting but not necessarily always in effect.
Color is available in three manners: 1) MAGIC counters can be converted
into color counters by means of expending two Spell phases; 2) a tile
can be enchanted by using two Spell phases and matched MAGIC and color
counter or three Spell phases and two matched MAGIC counter; 3) certain treasures,
days, and places always have color available.
Days are grouped into weeks of seven days for weather purposes and months of
28 days. At the start of a new month all monsters and unhired natives return
to their starting locations, the Campaign / Visitor / Mission counters are flipped
and penalties for unsuccessful campaigns and missions exacted.
|
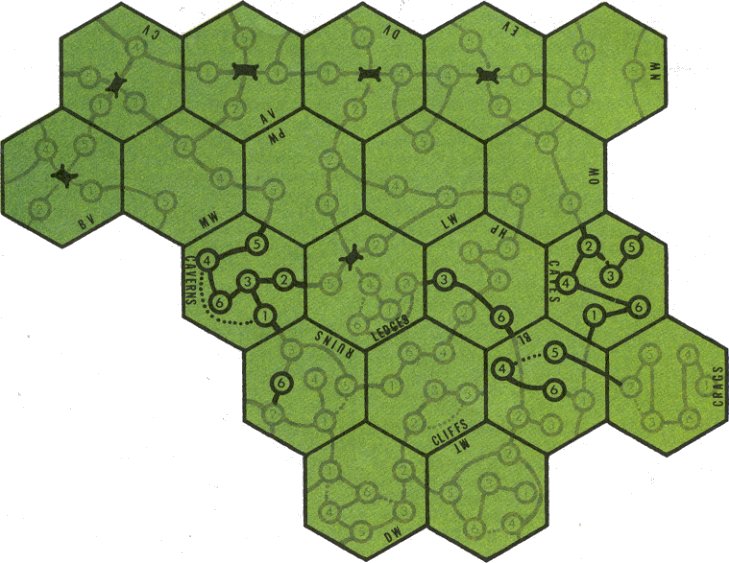
Figure 1 Before Enchantments
In the illustration above, note that although the valley tiles are all
adjacent, only Curst (CV) and Awful (AV) valleys have their potential
dwelling sites within a day's journey. Bad Valley (BV) and Evil Valley
(EV) are three days apart, and Dark Valley (DV) is all by its lonesome.
Indeed, it takes no less than 15 days to travel by foot from Bad Valley
5 to Curst Valley 5 (eschewing the hidden paths and secret passages) even
though the tiles are adjacent. Notice also how Cavern 2 leads into Ledges
5 and Border Land 5 into Crag 2. Anyone but the Amazon or the Elf will
have to forego his Hide roll to climb from these cave clearings to these
mountain clearings. Pity the Dwarf if the Inn should appear in Bad Valley!
Now, consider Figure 2 below.
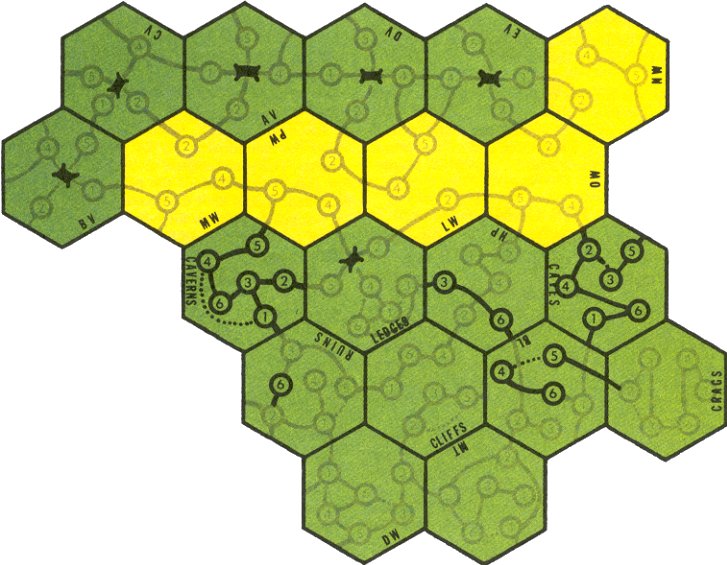
Figure 2 After Enchantments
What a difference enchanting the five "W" tiles makes! The valleys
are now completely cut off from the rest of the mapboard. If there are
no magicusers left behind, those characters stuck "behind the lines"
(as it were) will have to try to win without access to the treasure locations
and their high value monsters perhaps a mixedblessing for the Light characters.
This, in effect, dooms them to seek out their victory conditions by dealing
with or killing wolves, vipers, natives, each other, and an occasional
Heavy Flying Dragon (via Dragon Essence). Notice that if the Inn were
to be in either Awful or Curst valleys, simply enchanting the Maple Woods
(MW) would be sufficient to lock in the nomadic types for the duration
|
THE WITCH KING HIMSELF
Let's now examine the Witch King's assets. He has neither armor nor weapons.
He does start with four spells - more than any other character - and he needs
them. As mentioned before, he has no MOVE or FIGHT counters. What he does have
is MAGIC, in spades. He has four counters each of Types IV, V, and VI, so he
can make Purple and Black at will. Times are 3, 3, 4 and 4 for
the IV spells; 2, 3, 3 and 4 for the Vs; and 2, 3, 3 and 4 for the Vs. All carry
a single fatigue asterisk. Now, in order to cast a spell, a character must use
a MAGIC counter whose time number is less than or equal to the move times of
all monsters, natives and character combat counters on his sheet (i.e., attacking
him). The usual worst case (see "First Day Jitters" below) is a time
of two (easily supplied by the Elf, Swordsman, Druid, Woods girl, Rogue 4, or
Tremendous Octopus), which means any defense spell must either have a time of
two or have been prepared (an Alert phase expended that turn). Type IV spells
are suspect since the fastest time is three; there's no guarantee that the Witch
King will be able to alert the spell in time to use it.
Another problem the Witch King alone has to face is that to do practically anything,
he must cast spells which will fatigue MAGIC and/or color counters. This
inevitably means resting them often at in opportune times. Keep in mind that
a fatigued color counter takes a minimum of three (Rest, Spell, Spell)
phases to recover; that's two whole days in a cave clearing if you hide.
The Witch King's two special advantages are his "Aura of Power" and
the "Disembodied" state. The former gives him (and the Sorcerer, who
shares this advantage) an extra Spell phase every day, thus offsetting the Spell
phase lost to Rule 48.3. Since the Witch King will need to make a lot of color
and will likely enchant several tiles in the course of the game, it is a significant
advantage. Being "Disembodied" is a bit harder to gauge. Consider
Table 2. It is definitely advantageous with regard to finding counters and to
reading spells (no chance of a curse and you only get spells you can use); it
is definitely inferior for finding hidden paths, secret passages, and usually
hidden enemies. One needs a "3" or a "1" die roll to loot
a treasure card, as opposed to one through six (depending on how many treasures
are left) for the Loot Table but with Magic Sight you always draw the top treasure
card, making it the table of choice when three or less treasures remain. Also
remember, the treasures on top of the piles are large treasures and are generally
more valuable than those four or five down. Trouble is a lot of them are too
heavy to use Broomstick (see Movement below).
To conclude this section, we consider the Witch King's relationships with each
native group. First, he's allied with the Bashkars, a rambunctious bunch of
riding raiders who appear at the Campfires. The six of them range from L2* to
M5* attacks. They have a base price of 12 gold. More importantly, they have
six ponies for sale at a base price of 14 gold and a pony is as good as MOVE
counters outside of caves.
He is friendly with the Company, whose specialty is heavy destruction. Their
attack values range from L3* to T4*, including a H6/H1 Crossbowrnan. They have
some armor and arrive at either the Inn or the Large Campfire. You can expect
the Black Knight to try to hire the seven of them for free, however .
The Woodfolk, Rogues, Patrols, Soldiers, Guard, Shaman, Crone and Warlock are
all neutral. The Rogues are at the Inn, can be hired individually, and own six
slow horses. More on them later. The Woodfolk appear at the House or the Small
Campfire; they control all the bows. The Patrol appears at any of the fixed
dwellings and owns some armor . The Soldiers dwell at the House and the Guard
at the Guard House. Between them they control the Light and Medium weapons respectively
and some armor. The Shaman has a Type II and a Type III spell to sell and possibly
some expended potions. The Crone and Warlock have Type V and VIII and Type IV
and VI spells respectively for sale for a base price of ten gold; an excess
of gold can theoretically be turned Into "Usable Spells" by seeking
out these Visitors and dealing with them. In practice, it's very tough.
The Witch King is unfriendly with the Lancers and the Scholar. The former arrived
at the Chapel or either Campfire. The Scholar has three small treasures. If
he acquires a spell book, you have only a 2.78 % chance per Trade phase to buy
it for 200 Gold.
Finally, the Knights of the Order are his sworn enemies. The four Knights are
armored, mounted, and deadly. They dwell at the Chapel and own all the heavy
weapons, war horses, and suits of armor available. Avoid them like the proverbial
plague.
BEGINNING THE GAME
Before you get to choose your character, the board must be constructed and the
first player without a tile to play then chooses a character. During construction,
you should strive to make the board as favorable to your intended abilities
as possible. If you intend to fly, try to put the Valleys on the periphery of
the board and to isolate them as much, as possible via hidden paths, secret
passages, mountain and cave clearings and, perhaps best of all, "W"
tiles (Woods, excluding Deep Woods) where enchanting the tile would cut off
whole sections of the board. (Figures 1 & 2 show perhaps an ideal case).
Your ability to fly (or ignore roadways) will circumvent these obstacles and
leave the rest of the characters behind. Don't be surprised if you find those
intending to play the Witch, Druid, Dwarf, Amazon, or Wizard also setting up
such obstacles. See "The Disappearing Road Trick" below for further
discussion.
All right, the board is set and you've now become the Witch King. You get to
choose your victory conditions and your spells. Since the next few sections
deal with these topics exhaustively, nothing more will be said about them here
except to emphasize that your choices of victory conditions and spells are interrelated,
one must complement the other. The two of them will dictate your strategy of
play.
One further consideration before play begins. Try to get the Warlock and Crone
counters on the Shrine or the Bashkars where you're likely to spend some time.
You may be able to buy an extra spell. Don't count on this too highly as the
flip side of the Warlock is the beer truck (Food and Ale) and this often is
placed fairly early. Then again, if you anticipate a long game, it'll be available
as the Warlock next month.
MOVEMENT
The first major question to be answered during spell selection is movement.
It is so important a question that we'll examine each possibility at length.
Remember, the Witch King has no MOVE counters, so he must rely on other means
of locomotion.
HURRICANE WINDS (IV, Purple) Individual, Move: allows the individual
to FLY T1 in the next round of combat (presuming he survives the first one),
but is only effective in a mountain clearing. This may be a handy spell for
later in the game, but it is initially worthless since it can't be cast at the
Inn. It can be used later as a getaway spell if you're hidden and don't care
to hang around and risk another Hide roll on the morrow.
ABSORB ESSENCE (V, Black) Monster, permanent: caster becomes the
target monster and must fly if winged when moving. Although a spiffy attack
spell that could be used to augment movement later in the game, this spell is
not really suitable as an initial movement spell since no monsters appear at
the Inn except when Dragon Essence happens to be one of the treasures held by
a native group there. The chances of that range from 4.44% for only the Rogues
to 20.00% for the unlikely combination of the Rogues, Patrol, Company, and Scholar.
But then you'd draw a pair of Heavy Flying Dragons (provided someone didn't
activate them elsewhere); should you absorb one, you'll end up brawling with
the other and there is a 43.78% chance of your fatally losing this fight. Despite
that, this is an excellent spell for one on one encounters with tremendous monsters.
I especially recommend using it on a Troll or, better yet, the Flying Dragon
when heads and clubs are in play. See .'The Let's Get Physical Ploy" later.
BROOMSTICK (V, Black) Individual, Move: al lows the individual
to Fly L1 once, whenever he wishes. This is an excellent spell for quick getaways
or just to get ahead of the pack. Highly recommended. It does have drawbacks
though. The first is that you don't know for sure exactly where you'll land,
so don't forget to Hide before takeoff. Second, it ties up a MAGIC V counter
indefinitely. Third, you can't use it to transport Medium or heavier objects.
But one fast escape when you need it will make a believer out of you!
MELT INTO MIST (VI, Purple) Individual, Permanent: individual
has a MOVE T4 counter which is the only counter he may play when the spell is
activated. It allows the use of hidden paths and secret passages without discovering
them but precludes at tacks on or by the individual and any activity other than
Move. This is a very powerful spell for self use. It allows you to stroll to
your objective unhampered; and since it is a Type VI, you'll be able to cast
it with your VI2* counter and avoid trouble on the first turn. See "The
Vanishing Act" below for perhaps its most used ploys great defense as long
as your Purple counters last! The spell's chief drawback is that another
character may be able to deny you your objective merely by enchanting the tile
if it contains Purple magic, thus activating the spell and preventing
you from searching, brawling, resting, or even casting magic until you leave
the tile and return to normal. One way around this difficulty would be to take
a Dissolve Spell and to remove Melt upon reaching the place you want to loiter.
Beware of the Pilgrim with Exorcise! He can burst your immunity bubble and place
you at the mercy of whatever is in your clearing. All in all, teamed with Broomstick,
perhaps the best movement spell combination. It also has amusing offensive potential.
Consider when the Hoard is in a tile with Purple magic. Enchanting the
tile and then casting Melt on the Flying Dragon renders it totally impotent
for the rest of the game.
TRANSFORM (VI, Purple) Individual, Permanent: individual becomes
the creature indicated by rolling on the Transform Table, moving and fighting
with the creature's given values, and treating himself as a hired native leader.
You will either be able to fly or to ignore roadways and you have a 25% chance
of improving your carrying capacity and fighting strength. The drawbacks include
the worst features of Broomstick and Melt into Mist. That is, if flying you
have no control over where in a tile you'll land, and someone can activate the
spell against your will. It also has a few of its own. While it would be great
to be a Flying Dragon, the odds say a squirrel or frog is more likely and a
frog can be caught by someone/thing with a move time of two. The "ignore
roadways" feature is particularly tempting in light of the lousy chance
to find hidden paths and secret passages that the Magic Sight Table provides.
But a hired leader can not search, record Fame and Notoriety, glimpse counters,
etc. under these conditions (i.e. , owner not present) unless the Hired Captain
optional rule is in effect. It remains a decent attack spell and should you
take Unleash Power, acquire a Gloves card somewhere along the way, or hire some
natives, you can indulge in the "Transform Trick" (see below).
UNLEASH POWER (VI, Purple) Magic Chits, Day: converts MAGIC counters
into MOVE/ FIGHT counters which can be used for either movement or attacking
with the time number of the counter determining both time and strength. This
is best used for moving short distances, ideal for movement from where Broomstick
landed you to where you really want to go. Your two and three time counters
become Light and the fours become Medium, so you still won't be able to haul
Heavy or Tremendous treasures. Warning: the spell expires before the Combat
portion of the day begins, so you won't be able to use it to run away or fight
until it's recast; meaning, if not hidden, you can only maneuver during the
first round of combat.
SLOW HORSE: Well, you might try to buy a horse from the Rogues, but your
chances are dismal one in 11,664 or less than 0.01 %. This translates, at four
phases a day with no Hides, into once in 2,916 days (or eight game years). And
if the Cloven Hoof shows up (same chances as Dragon Essence cited before), forget
it that +1 DRM makes it impossible. Notice that if someone kills the Rogue leader,
his treasures and horses will be abandoned in the clearing; but since there
is no provvision in the Magic Sight Table to loot a horse, you're still out
of luck unless another character will loot one and then sell/give it to you.
Don't hold your breath. Also, horses die in caves, thus possibly cut ting you
off from large portions of the board.
BOOTS: There is a 21.12% chance that one of the five Boots cards will
be held by the Rogues. Un fortunately, three of the five offer the same chance
of purchases as did a slow horse. The other two, the Elvin Slippers and the
Seven League Boots, offer a slim 0.33% chance to purchase. The Patrol, should
they arrive, offer similar prospects, but the Company offers odds 36 times better
since they're friendly, 0.31 and 11.81% respectively. While a Boots card is
the optimum solution to the movement problem and there's up to a 52.88% chance
of one being there, this option is not really reliable enough to risk your whole
game upon. But don't pass up the chance if it presents itself.
OTHER MEANS: Later in the game, a pony can be purchased from the Bashkars
or, if you've picked up the Quest counter, a warhorse from the Order . Perhaps
you can discover the Flying Carpet (a large treasure and thus never in with
the Natives' treasures) or one of the Boots cards at a treasure site.
As an insight into the movement problem (and how the designer probably intended
the Witch King to be played) consider the Witch King at his first level of development,
as a Wraith. Here he has only three combat counters: MAGIC IV4*, MAGIC V4*,
and MAGIC VI4*. Due to color considerations, only a Type VI spell makes any
sense since the Type IV counter can't simultaneously be itself and the Purple
counter is needed to cast the spell. Likewise the Type V and Black. Thus
only Melt into Mist, Transform, and Unleash Power are viable choices. Choosing
a permanent spell over Unleash saves one Rest Phase per spell activation; and
Melt is preferable to Transform due to its assured carrying capacity and better
defensive aspects.
To sum up this section then, the Witch King should take Broomstick and either
Melt into Mist, Unleash Power, or Transform as his movement spells. Don't expect
to get a Boots card for initial movement but if the opportunity arises, grab
it.
|
TABLE 1 - Basic Odds in MAGIC REALM
|
Number
Rolled
|
One Die
|
Two Die
|
|
equal
|
less than
|
equal
|
less than
|
|
1
|
16.67 %
|
16.67 %
|
2.78%
|
2.78%
|
|
2
|
16.67 %
|
33.33%
|
8.33%
|
11.11%
|
|
3
|
16.67 %
|
50.00%
|
13.89%
|
25.00%
|
|
4
|
16.67 %
|
66.67%
|
19.44%
|
44.44%
|
|
5
|
16.67 %
|
83.33%
|
25.00%
|
69.44%
|
|
6
|
16.67 %
|
100.00%
|
30.56%
|
100.00%
|
|
|
TABLE 2 - Comparison of Magic Sight to Other
Search Tables
| Action |
Search
|
Peer
|
Locate
|
Loot
|
Read
|
Magic Sight
|
| Hidded Enemies |
27.78%
|
33.33%
|
11.11%
|
-
|
-
|
varies *
|
| Hidden Paths |
22.22%
|
-
|
25.00%
|
-
|
-
|
2.78%
|
| Secret Passages |
16.67%
|
-
|
11.11%
|
-
|
-
|
2.78%
|
| Glimpse Counters |
11.11%
|
33.33%
|
11.11%
|
-
|
-
|
-
|
| Find Counters |
2.78%
|
2.78%
|
11.11% **
|
-
|
-
|
25.00%
|
| Loot (treasure) |
-
|
-
|
-
|
varies ***
|
-
|
16.67%
|
| Learn Spell |
-
|
-
|
-
|
-
|
25.00%
|
19.44%
|
| Free Spell |
-
|
-
|
-
|
-
|
44.44%
|
19.44% *
|
| Curse |
-
|
-
|
-
|
-
|
25.00%
|
-
|
* Depends upon what the "Hidden Enemy"
is carrying: ranges from 2.78% to 44.44%
** If "Glipse Counters" previously in turn, the odds are 55.56%
*** Depending on the number of treasures remaining: ranges from 2.78%
to 100.00%
|
|
TABLE 3 - Fiery Blast and Lightning Bolt
against Monsters, Natives, Horses, and Unarmored Characters
| Spell |
L
|
M
|
M*
|
H
|
H*
|
T
|
T*
|
| Fiery Blast |
100%
|
69.44%
|
44.44%
|
44.44%
|
25.00%
|
25.00%
|
11.11%
|
| Lightning Bolt |
100%
|
100%
|
69.44%
|
69.44%
|
44.44%
|
44.44%
|
25.00%
|
|
|
TABLE 4 - Meeting Table Odds
| |
Free
|
x1
|
x2
|
x3
|
x4
|
No Deal
|
C/I
|
B/B
|
| Allied |
2.78%
|
8.33%
|
13.89%
|
19.44%
|
55.56%
|
-
|
-
|
-
|
| Friendly |
0.08%
|
0.23%
|
22.61%
|
19.89%
|
26.54%
|
30.56%
|
-
|
-
|
| Neutral |
0.002%
|
0.01%
|
0.63%
|
8.89%
|
15.47%
|
52.08%
|
13.58%
|
9.34%
|
| Unfriendly |
-
|
-
|
-
|
-
|
2.78%
|
22.22%
|
44.44%
|
30.56%
|
| Enemy |
-
|
-
|
-
|
-
|
-
|
-
|
8.33%
|
91.67%
|
"C/I"=Challenge or Insult
"B/B"=Block/Battle
|
OTHER SPELLS
Remember, at this point the board has been assembled but the whereabouts of
the Inn is still unknown. You 've chosen a set of movement spells that best
compliment the structure of the board. The time has come to choose your other
spells. It is now that the truly tough planning decisions must be made, for
these remaining spells will largely dictate how you can play the game until
such time that different spells can be learned (if ever). There are a total
of twenty spells in Types IV, V and VI. We've already discussed six of them.
Now the others.
BLAZING LIGHT (IV, Purple) clearing, Day: extra phase in cave
clearing for all that begin the turn therein. A good spell if you plan to spend
a lot of time in enchanted caves with some friends. But remember, the phases
you gain will have to be repaid later in Rest Phases, which means that if you
stay in the caves no net gain in phases (for you). But ah, for your comrades!
This one is best used for a spell book or artifact in an enchanted Purple
tile.
ELEMENTAL SPIRIT (IV, Purple) MAGIC chits, Day: changes Type IV
counters to Type VIII and Type VI to Type V for a day. This spell was probably
designed for the Sorcerer. If the Witch King should take it, he can only gain
the Type VIII spells. The temptation is to increase the "Usable Spells",
victory criterion and to go to the Statue for the Type VIII spell there. This
would surely be falling into a small trap. In order to claim the Type VIIIs
for victory purposes, you couldn't claim any of the Type IV s or Vs that you
might also have learned and vice versa. Not recommended.
FIERY BLAST (VI, Purple) multiple, Attack: a L*** (=T) missile
attack rolled separately for each target. A dandy spell; highly recommended.
A guaranteed kill on unarmored Light characters, and a 69.44% chance versus
unarmored Medium monsters, natives, and characters. Table 3 provides the gory
details. Armored characters are another story , with only a 11.11% chance of
killing them (2.78% with the Armored Bonus rule in effect) .This is an excellent
antigoblin weapon (especially considering your limited mobility) if they are
on someone else's sheet since there's only an 11.22% chance of wiping out a
whole sixpack of them. The "Goblin Gambit" has proven to be a profitable,
although gutsy, trick. See below.
LIGHTNING BOLT (IV , Purple) individual, Attack: one M*** ( =T*)
missile attack rolled against a single target but only in a mountain clearing.
This spell is stronger than Fiery Blast, but is much more limited only one target
and then only in the 19 mountain clearings. It's a guaranteed kill on an unarmored
Light or Medium target but since when do Medium monsters travel alone? Still
it offers a 44.44% chance of bagging a solitary, unarmored Tremendous monster.
See Table 3 for odds breakdown.
ROOF COLLAPSES (IV , Purple) clearing, Attack: Smash H4 attack
against every character in the cave clearing (including you). This one is blatantly
antiDwarf. 'Nuff said.
VIOLENT STORM (IV , Purple) hex, Day: causes up to five phases
to be lost in all Woods and Mountain clearings in the tile (caves are excluded).
This one is also just harassment.
ASK DEMON (V, Black) demon, Instant: caster gets to ask a secret
yes/no/number question of another player, who must answer truthfully. Before
using this one, you probably ought to cast Pentangle (see below) to ensure that
the demon doesn't kill you in subsequent rounds of combat. Then again, it's
hard to anticipate what questions might be worth squandering a spell on.
CURSE (V, Grey) character, Instant: roll on the Curse Table and
apply result to the target. Another harassment spell and one wonders why it's
not a Type VIII as noted on the Imp's counter. Don't even consider it.
PENTANGLE (V, Black) individual, Combat: demons and imp cannot
be committed against the individual; effects of spells and curses against him
personally are ignored. If you anticipate doing magical battle with any character
(Sorcerer and Witch mainly) and intend extended visits to the Shrine and/or
Statue, this one's a must. Otherwise ...This pairs well with Ask Demon; but
this spell is no defense against Exorcise.
POWER OF THE PIT (V, Black) individual, Instant: Power of the
Pit attack is rolled against the target. This one is great if you're a Demon,
but not if you're a Light character!! A gutsy attack as the odds are all against
you in fact, there is a 16.67% chance (rolls of 1 and 3) that the spell itself
will kill you and even better odds that your target will kill you. For instance,
if used against the Berserker without a movement counter of some sort, he need
merely play his FIGHT H5 counter; there is then only an 8.33% chance you will
survive. If you like those kinds of odds, Las Vegas was built for people like
you. Take my advice and pass it up. Please. Probably easier to just absorb a
demon.
DISSOLVE SPELL (VI, Purple) spell, Instant: causes target spell
to be broken, can't be used against curses. Useful for breaking permanent spells
that you have on yourself or others if you're so inclined. It. pairs well with
Transform and Melt into Mist. Consider it carefully.
ENCHANT ARTIFACT (VI, Purple) artifact, Permanent: enables character
to "attach" one of his recorded spells onto an artifact. This results
in a readily prepared spell just awaiting color to be cast. If lent/given/sold,
it allows other characters to cast one of your spells when the proper color
is present. A fascinating spell with only one drawback it can be used but once,
and then only on the eight artifact cards. Great with Blazing Light or Fiery
Blast.
PHANTASM (VI, Purple): character, Day: character has an invisible
double which can Move, Peer and Spell on the next turn, and which can neither
block nor be blocked. This one is a recon unit for cautious players. The Phantasm
will be fatiguing your MAGIC and color counters when he Spells, but will be
able to move even though you might not. Can be used with Melt into Mist or Transform
to unenchant Purple tiles from a distance so you can later move there
and Search.
WORLD FADES (VI, Black) character, Permanent: allows the character,
if unhidden at the end of a Round of Combat, to make a normal Hide roll, hiding
if successful. May only use Magic Sight Table when searching. Probably designed
for the Magician. The free Hide aspect is a bit shaky; one can only take the
Hide roll if no monsters, natives, or characters are on your sheet just when
you'd need it most. A poor choice.
To summarize, Fiery Blast should probably be chosen as a desperation defense
against masses of medium monsters, unarmored characters, unarmored heavy monsters,
and noxious natives. That leaves a choice of Absorb Essence or Transform for
oneshot defenses against solitary Tremendous monsters. Consider Enchant Artifact,
Pentangle, or Phantasm if you don't take Broomstick.
|
TABLE 5 - Odds of Survival of Monster vs
Other Monsters
| |
1
|
2
|
3
|
4
|
5
|
6
|
7
|
8
|
9
|
10
|
| 1) F. Dragon 1 |
0
|
0
|
66.7
|
66.7
|
66.7
|
4.4
|
66.7
|
?
|
?
|
?
|
| 2) F. Dragon 2 |
100
|
44.4
|
100
|
100
|
100
|
100
|
100
|
100
|
69.4
|
23.2
|
| 3) Dragon |
33.3
|
0
|
0
|
33.3
|
33.3
|
33.3
|
0
|
11.1
|
7.7
|
23.2
|
| 4) Giant |
33.3
|
0
|
66.7
|
44.4
|
0
|
11.1
|
0
|
0
|
7.7
|
0
|
| 5) Serpent |
33.3
|
44.4
|
66.7
|
66.7
|
44.4
|
100
|
44.4
|
44.4
|
23.2
|
0
|
| 6) Spider |
100
|
44.4
|
66.7
|
88.9
|
44.4
|
44.4
|
44.4
|
44.4
|
44.4
|
0
|
| 7) Troll |
33.3
|
44.4
|
100
|
100
|
100
|
100
|
44.4
|
100
|
7.7
|
23.2
|
| 8) Octopus |
100
|
44.4
|
88.9
|
88.9
|
81.5
|
100
|
44.4
|
44.4
|
83.0
|
44.4
|
| 9) F. Demon |
97.2
|
27.8
|
89.5
|
89.5
|
74.1
|
59.9
|
89.5
|
59.9
|
55.2
|
0
|
| 10) Demon |
97.2
|
27.8
|
74.1
|
89.5
|
89.5
|
97.2
|
74.1
|
59.9
|
97.2
|
19.3
|
The monsters above are numbered; each corresponds
to the column as well as the row (thus, column 7 and row 7 both relate
to the Troll), To use this table, find the row of the absorbed monster;
then read across to the column of the monster faced. Thus a Troll has
a 23.2% chance of survival against a Demon (column 10). Dragon 1 is the
Hoard monster, while Dragon 2 is the one derived from the Transform Table.
"?"=unreadable
|
|
TABLE 6 - Odds of Survival of Monster vs
Other Monsters (Heads and Clubs in effect)
| |
1
|
2
|
3
|
4
|
5
|
6
|
7
|
8
|
9
|
10
|
| 1) F. Dragon 1 |
66.7
|
100
|
100
|
100
|
100
|
100
|
100
|
?
|
?
|
?
|
| 2) F. Dragon 2 |
43.9
|
44.4
|
89.9
|
89.9
|
100
|
100
|
100
|
100
|
69.4
|
23.2
|
| 3) Dragon |
46.2
|
66.7
|
69.4
|
69.4
|
100
|
77.8
|
33.3
|
66.7
|
46.3
|
54.0
|
| 4) Giant |
44.1
|
66.7
|
69.4
|
69.4
|
100
|
72.2
|
33.3
|
55.6
|
50.2
|
46.3
|
| 5) Serpent |
10.0
|
44.4
|
19.2
|
19.2
|
44.4
|
100
|
44.4
|
44.4
|
23.2
|
0
|
| 6) Spider |
26.7
|
44.4
|
28.6
|
54.1
|
44.4
|
44.4
|
44.4
|
44.4
|
44.4
|
0
|
| 7) Troll |
23.2
|
44.4
|
89.9
|
89.9
|
100
|
100
|
44.4
|
100
|
7.8
|
23.2
|
| 8) Octopus |
42.4
|
44.4
|
59.2
|
59.2
|
81.4
|
100
|
44.4
|
44.4
|
83.0
|
44.4
|
| 9) F. Demon |
72.4
|
27.8
|
68.9
|
64.2
|
74.1
|
59.9
|
89.5
|
59.9
|
55.2
|
0
|
| 10) Demon |
48.6
|
27.8
|
47.7
|
68.9
|
89.5
|
97.2
|
74.1
|
59.9
|
97.2
|
19.3
|
Results assume that the absorbed monster will always
play its club/head side up.
"?"=unreadable
|
STRA TEG IES
We'll next consider several distinct strategies and the spells to be taken when
employing them. I call them the "Lone Wolf", the "Lone Ranger",
the "Good Ole Boy" and the "Hit Man". These four are actually
opposite corners of the spectrum of possible strategies. None are guaranteed
winners, although some have better chances than others. We'll also look at a
compound strategy I'll call the "Leader of the Pack".
The "Lone Wolf" strategy entails going off alone, avoiding other characters
and doing your own thing. It calls for alert self reliance and for a brand of
cunning deviousness usually found among mere mortals only in DIPLOMACY players.
Flying ahead to pull the Disappearing Road Trick is standard procedure. Broomstick
and Melt into Mist are all but essential. Seek out the Shrine and the Bashkars.
Consider Absorb Essence and then go trolling for a Tremendous Troll or Flying
Dragon to absorb; it'll tend to discourage disturbances.
The "Lone Ranger" strategy requires that you find a Tonto. If you're
playing two characters simultaneously, there's no problem. Otherwise, take your
chances and hire a Rogue; there's only a 9.34% chance of Block/Battle on any
given roll. You won't be able to fly and take "Tonto" along, so take
Unleash Power and plan to do a lot of walking. Beware of hidden paths and secret
passages. You only have a 2.78 % chance of finding them using Magic Sight, and
unless your Rogue is the leader he won't be able to search for you either. Phantasm
won't help much since the Peer Table has no provision to find paths and passages.
Melt into Mist won't let you be followed. An interesting ploy is to trans form
the Rogue! When the spell is active, he functions as a hired leader; he can
then search, peer, and loot as long as you travel together. Don't let his term
of hire expire without dissolving the spell or killing him though.
Now, this strategy should be used only if all the valleys have open (or potentially
open via enchantment) access to the board. Tonto's main purpose in life if he's
not a character or leader is to serve as baggage handler and human sacrifice
to any monster that jumps you, enabling you to recast Unleash Power and run
away.
The "Good Ole Boy" strategy entails being a social animal and running
with a bunch of characters, each aiding the others. This is potentially the
most powerful manner of playing the game, but is rife with difficulties (chiefly
mistrust and greed). Unlike the "Lone Ranger" or "Hit Man"
strategies, here all are equal partners. You will need Unleash Power in order
to walk around with the gang. Fiery Blast and Blazing Light are highly recommended
and Transform, Lightning Bolt, and Enchant Artifact are only slightly less so.
An early test of the group's loyalty will be in acquiring any boots card that
the Rogues and others may have for your use. You in turn, will be expected to
read runes via Magic Sight, provide extra phases in caves, and Fiery Blast away
gaggles of goblins, wolves, ogres, bats and whatnot. Victory conditions should
include Fame, Notoriety and perhaps Spells ...or a Great Treasure. Beware of
a doublecross.
The "Hit Man" strategy reverses the roles of the Lone Ranger strategy;
here you're Tonto. Your mission, should you choose to accept it, is to harass
and ultimately destroy every other character except yourself and your liege.
Standard tactics include the Disappearing Road Trick, casting Violent Storm,
attacking Light and Medium unarmored characters with a prepared Fiery Blast,
and perhaps going Dwarf hunting with Roof Collapses. The strategy calls for
the ruthless cunning of a gangster and the sacrifice and dedication to duty
of a kamikazi you may occasionally win with this one, but don't count on it.
Use it to avenge the death of your first character when using the Revival or
Exchanging Characters optional rules., or to make straight the path of your
other characters of playing the Multiple Character option, or even to set your
wife up for a win. Your victory conditions should include Gold and be heavy
on Notoriety (gathered from your vanquished opponents). Good luck.
The "Leader of the Pack" strategy combines the "Lone Wolf"
and the "Lone Ranger" strategies. First the Witch King takes off in
typical lone wolf fashion and mucks around until he has sufficient gold to both
purchase a pony and hire the Bashkars. He and his gang then sweep down on unsuspecting
characters and monsters, wreaking havoc. The problem with this strategy is that
it takes too long to accomplish; if you're playing the standard four VP game
one of those Heavies often wins it in a couple of weeks. Just the process of
getting the requisite gold or treasures to purchase the pony can take you that
long. Still this is a quite viable strategy for longer games. Consider taking
Broomstick and Melt into Mist for movement and Fiery Blast and Trans form for
attack. Melt will serve as a defense spell also. Of course all this presumes
that cave clearings can be totally avoided.
Your best chances, if new to the game, probably lie with the "Lone Wolf"
strategy. Your power is likely to be feared by the other characters, who probably
wouldn't let a chance to slay you pass by. The "Good Ole Boy" strategy
is likely to tempt them over much. The "Lone Ranger" gambit will slow
you down more than it will help. The "Hit Man" strategy is just short
of suicidal; but then if you can't take chances in a game, where can you take
them?
VICTORY CONDITIONS
Let's examine each of the victory conditions and discuss the relative ease of
achieving them for the Witch King. Keep in mind that whatever victory conditions
you might select will largely determine the strategy you'll need to employ.
GREAT TREASURES: Seventeen of the 74 treasure cards (22.97 % ) are Great
Treasures. This breaks down to seven of 45 small treasures (15.56%), ten of
23 large treasures (43.48%), and none of the six Treasures within Treasures
(0% but four of these contain large treasures). Thus the chances that the Rogues,
or any other native group for that matter, have exactly none, one or two Great
Treasures are 71.01 %, 26.87% and 2.12% respectively; thus, better than two
in seven that at least one starts the game at the Inn. But of these only Dragon
Essence allows a reasonable chance of purchase (9.53 % ) with the ten Gold you
start with (see discussion under "Absorb Essence" for likelihood of
appearance). Dealing with the Company or the Bashkars increase these odds to
42.90% and 44.44% respectively. Clearly one shouldn't expect to immediately
acquire a Great Treasure in this way, especially with the other characters also
in the bidding. Table 4 shows the actual odds break down from the Meeting Table.
Slaying another character for his gold and treasures is a possibility of course.
Unfortunately, while you cast your attack spell in the encounter step, there's
nothing to prevent the intended victim from running away. A hired native would
solve that problem, or attacking him when transformed or as an absorbed monster.
Given that you'll want to Loot, the question becomes where. A close inspection
of the Treasure Troves and the odds discussed so far shows that the Hoard, the
Vault, and the Altar are the sites of choice.
The Hoard (or the Pool for that matter) has a 50% chance of being in a cave.
The Flying Dragon is the defender, and if the "Clubs/Heads", optional
rule is in play, it should be your first choice to absorb; most characters and
monsters haven't a chance to "whup 'im" (see Tables 5 & 6). There's
also a 50.06% chance of at least one Great Treasure amongst the four small treasures
there. The Pool suffers the disadvantage of causing you to fatigue a counter
for each Loot Phase and isn't recommended unless you have some hired leader
to do the looting since he can't fatigue.
Unless you have the Lost Keys, the Vault has to be broken into to be looted,
but Melt into Mist or a lucky Fiery Blast (25% ) can handle that; Unleash Power
can't. Lightning Bolt can (44.44%) when the Vault is in Mountain or Crag (20%
of the time). The resident monster is a Troll just the kind of guy you'd like
to absorb. On the average, it should take four Search Phases to find the counter,
and seven more for each treasure. With one Hide phase a day, that's 39 days
in a cave or 13 days in the open. Start early.
The Altar with four large treasures has odds of 16.33%, 40.91 %, 32.38%, 9.52%,
and 0.89% of exactly zero through four Great Treasures being there. The two
spells there are worthless to you.
The Shrine has only two large and two small treasures. Odds are 57.82% that
there is at least one Great Treasure among the large and 28.99% for at least
one among the small. Overall that's 29.95%, 44.57%, 21.39%, 3.95% and 0.23%
for there being from zero to four Great Treasures respectively. Not the most
favorable; but since there is a Type V spell there, you can save some time and
search for both simultaneously.
To sum up, if Great Treasures are among your victory conditions, expect to spend
a lot of time searching at a treasure location. The Vault and the Hoard offer
the best chances for large treasures and also a good, strong defending monster
to absorb. The Phantom Glass would be a useful acquisition since combined with
the superior "Find Counter" chances offered on the Magic Sight Table,
it would make looting truly efficient. You must also be able to transport your
booty, so don't expect to FLY L1 via Broomstick afterwards. Indeed, even Unleash
Power is suspect, so Melt into Mist is almost a must.
USABLE SPELLS: There is always a temptation to take several VPs in this
category .After all, you have three or possibly four (if Elemental Spirit was
taken or learned) types to draw from. Resist the temptation.
First of all, even if all the treasure location counters have been revealed,
you would only know with certainty where one spell would be the Type V spell
at the Shrine (double that with Elemental Spirit and include the Type VIII at
the Statue). All the others must be looted or traded for. The Warlock and Crone
may not be active this month or may never appear if they are. These visitors
are prohibitively expensive anyhow, at least in the early stages of the game.
The bulk of the Type IV and VI spells are in the two spell books somewhere out
there (forget them if the Scholar has them). They are worth killing for. Thus
all the available Type IV through VI spells are restricted to the Shrine, three
spellbooks, three artifacts, and two visitors. Adding the Type VIII spells increases
it to only two sites, three books, four artifacts, and the same two visitors.
Thus out of the 74 treasures only six (or seven, 8.11% or 9.46%) are what you
seek.
At most, take one point unless a really long game is contemplated. You may be
able to work a deal with another character to Magic Sight an artifact; you record
the spell and he gets a useful artifact.
FAME: Fame is gained only by killing monsters, returning lost treasures
to their proper owners, and by possessing certain treasures, but most treasures
carry negative Fame (if any) .This is especially true of those you covet most.
Avoid this category unless you're contemplating the "Goblin Gambit",
the "Transform Trick", or the "Let's Get Physical Ploy".
NOTORIETY: Gained like Fame, but also from killing natives and other
characters. The treasures you seek have positive Notoriety so at least one point
and probably two should be taken here. Remember that Notoriety gained from killing
a character is his recorded Notoriety at the time of his demise.
GOLD: There are only four ways to augment that ten Gold you start with:
sell treasures or items, conduct certain missions, loot certain treasures within
treasures, or kill characters for what they have (or natives if the "Pocket
Change" optional rule is in effect). In practice only the first two options
are practical, as most players seem to use any gold they have for new armor
or weapons or to hire natives. That leaves looting and missions. Looting, as
we've seen, can take a long time and presumes a carrying capacity to haul the
loot back to a dwelling to sell A mission merely requires being where the counter
is likely to turn up and waiting for the "Monster Roll", of six, then
picking it up and getting it to its destination. Your ability to fly can make
this an extremely easy way of making a fast buck. Unfortunately, the Warlock
is the flipside of the beer truck, so you can't have it both ways.
No one set of victory conditions can of should succeed every time. Nor would
we really want them to. Someone planning to aggressively pursue the "Goblin
Gambit" may split the VPs between Fame and Notoriety, while another might
emphasize Treasures, and yet a third may prefer a more balanced approach. Just
remember that you'll be stuck with these goals for the rest of the game. Try
to make them attainable.
TRICKS OF THE TRADE
COLOR MANAGEMENT: Obviously, you want to keep your fastest MAGIC counters
available for casting spells rather than tying them up as color , but also be
wary of casting permanent spells with them. Prior
to the first turn, convert only the mid ranged counter to color. Then, if there's
no rush, use the slowest counters for the permanent spells or the morrow's movement
spell. If you're using Unleash Power, you then have some Medium counters to
use if necessary. Never willingly get too low on color!
THE DISAPPEARING ROAD TRICK: Enchanting the various woods tiles drastically
alters the roadway patterns. When the board is set up favor ably, it can stop
the nonmagical characters cold. (See Figures 1 and 2). The Ruins tile is also
some times effective in this way. These enchantments do increase the powers
of the Elf, Wizard, and Magician so some care should be taken. Enchanting tiles
with Purple present should be avoided if you are using Melt into Mist
and there is a treasure location of interest there. The nuisance value of this
trick (provided you did well on the board building phase) is often well worth
the few phases it cost you.
FIRST DAY JITTERS: You are at your weakest today. The other characters
may want to get you now while they can. The Wizard, Swordsman, Sorcerer, and
Pilgrim are suspect here. The Swords man can elect to go first, then block you
at the first opportunity. If he does, the best thing to do is to block everyone
else you can. Sure, that won't win you many friends, but you don't want one
of those spellslingers to alert a spell and do you in either . You won't be
able to move since you've not yet cast any spells any battle is apt to be short
and decisive. The Wizard and Sorcerer can alert a Fiery Blast, block you, and
then fry you easily. The Pilgrim's Exorcise will leave you helpless for the
second round. Stones Fly could also be fatal (Druid, Wizard, and Witch). So
typically you'll need to cast a spell with a time of two to avoid trouble. This
precludes the type IVs. Melt into Mist is the only real choice. With Broomstick,
you'd only be able to maneuver that round not fly away .But the third round
you'd be out of luck (and out of Type V and Black counters). Unleash
Power would allow you to maneuver and to attack next round with the optional
dagger but you probably won't survive that long. Only Melt offers immunity -
barring Exorcise - from the stings and arrows of outraged opponents. It can
be a jungle out there!
THE GOBLIN GAMBIT: Going into a caves tile and feel a bit gutsy? Have
you recorded Fiery Blast? Do you have a Broomstick Fly Ll counter ready to go?
Then you're ready for some quick relief for your Fame and Notoriety totals!
Merely lure a six pack of goblins to your clearing, stack them together, and
cast a prepared Fiery Blast, then use your Broomstick to maneuver. While there
is an 11.22% chance of killing all of them immediately, any survivors (and there's
likely to be two or three of them) have only one chance in three of matching
your direction and killing you (the spear goblins would also have to change
tactics, 10.19% chance overall). Let's say you nailed four of them for 10 points.
You may now either perform a Vanishing Act or hit them with another Fiery Blast
and hope for the best since you won't be able to maneuver . In the latter case,
you have a 40.76% overall chance to survive against wolves or axe or sword goblins
(59.54% against the spear goblins) while garnering 21 points. Not recommended
when using the "Deadly" rules. The astute reader will have noticed
that attacking a stack consisting of two or more six packs and sundry other
monsters increases the payoff for a single Blast while the risk remains the
same. If using the "Magical Attacks" optional rule, be sure to alert
the Type IV counter!
THE LET'S GET PHYSICAL PLOY: Tired of skulking around in a cloud of mist?
Are you tired of running away from every tinplated, clattering vagabond on the
board? Well take Absorb Essence and grow hair on your palms as a Troll or sprout
wings and claws to be a Flying Dragon. The benefits
are legion. Your carrying capacity becomes tremendous and your fighting ability
is fearsome (see Tables 5 and 6 for chances for surviving vs other monsters).
Watch the points roll in (as well as a few heads rolling off) as your alter
ego rips into the lesser monsters and characters.
THE TRANSFORM TRICK: This is a favorite trick of the Sorcerer and the
Magician. First trans form a Monster into a squirrel or frog, and then kill
it with your optional dagger or stomp on it with hired thugs. Of course, a low
dice roll can transform it into something quite nasty. but there is a 75 % chance
of transforrning it into something totally innocuous. Be sure to slay the beastie,
or you won't be able to cast the spell again.
THE VANISHING ACT: Cast Melt into Mist on yourself. Keep a few Purple
counters on hand. Whenever you're confronted with something too big (or numerous)
to handle, just "pop a Purple"; that is, play a Purple
counter to activate the spell during that encounter step. Nothing except Exorcise
can then affect you even other alerted spells. On the morrow, you have the choice
of hiding or re activating the spell and leaving.
CONCLUSION
Finally, I want to emphasize that this article does not put forth a foolproof
set of guidelines. MAGIC REALM is too full of unpredictable quirks for any one
to claim that. That's its charm. But I hope that some of the ideas I've set
forth here will help you to grasp some of the subtleties of this marvelous game.
Enjoy!
Return back